PIE LAB Recap

Here’s an unpopular opinion: I’m not a pie person.
I know, I KNOW. It’s cool to like pie! It’s homey! And rustic! Pie is both ironically and unironically humble.
Now, I don’t dislike pie, it’s just not high on my dessert priority list.
For the record, here is my dessert priority list:
Ice cream
Cake
Oreo cookies
Chocolate chip cookies
All other cookies
All pastry that isn’t pie
Pie
Cheesecake
Nut-centric desserts
Donuts (they are fine but let’s agree that they are a snack, not a dessert)
However, a very unscientific poll I conducted on Instagram informed me that the majority of my friends are pie people. I feel betrayed and alone. My own husband is a pie person, for goodness’ sake.
But because I’m a good woman, a good friend and a good Hayner (100% of whom are pie people), I carry the torch. I think a lot about how to optimize pie. I’ve decided, if I’m going to keep making pies every year for Danny’s birthday, and probably for Thanksgiving, and definitely for PIE LAB, it is urgent and imperative that I hone a pie recipe that yields a result I find delicious.
Here are my beefs with pie (sweet, fruit pies that is):
Risk of soggy/undercooked bottom
Crust itself often not flavorsome; merely a vehicle for fruit
Cooked fruit often tastes too sweet to me
Time and labor acquiring and prepping fruit (I mean I love an orchard day as much as the next gal, but farm-to-pie is a beautiful ideal I may never actually live up to)
Fruit filling often turns out runny and does not slice clean
(Incidentally, maybe you’re wondering if there’s a simple solution for these pesky issues. There is, and it’s called cake.)
Here are some ways I address these issues:
Blind-bake the bottom crust
Insist and I mean INSIST on an all-butter crust
Use more tart fruits, use lemon juice/zest, use less sugar
Use fruit prep time to meditate and/or generally get over the tedium
Judicious use of flour or cornstarch or tapioca flour to thicken filling
Let’s complicate this a bit more with my beloved husband, who is not only a pie-lover, he has a fondness for the (admittedly delicious) sort of gooey apple pies that one finds in grocery stores across this nation. You see, Danny grew up a pie lover amid mostly store-bought pies. I grew up pie-apathetic amid a sea of homemade pies. (Isn’t it supposed to work the… other way around?)
So for this year’s PIE LAB, I realized I needed to completely rethink pie as I have known and learned it.
I needed a crust that tasted like the finest buttery pastry, bronzed and crackling in spots (for me). I needed a filling that was still firm, but gestured gracefully and quietly toward goopy (for my life mate and let’s face it, the person for whom I’m really making pies anyway).
Lucky for all of us, a friend tipped me off to a recipe on Serious Eats that basically read my mind and solved all my problems for me.
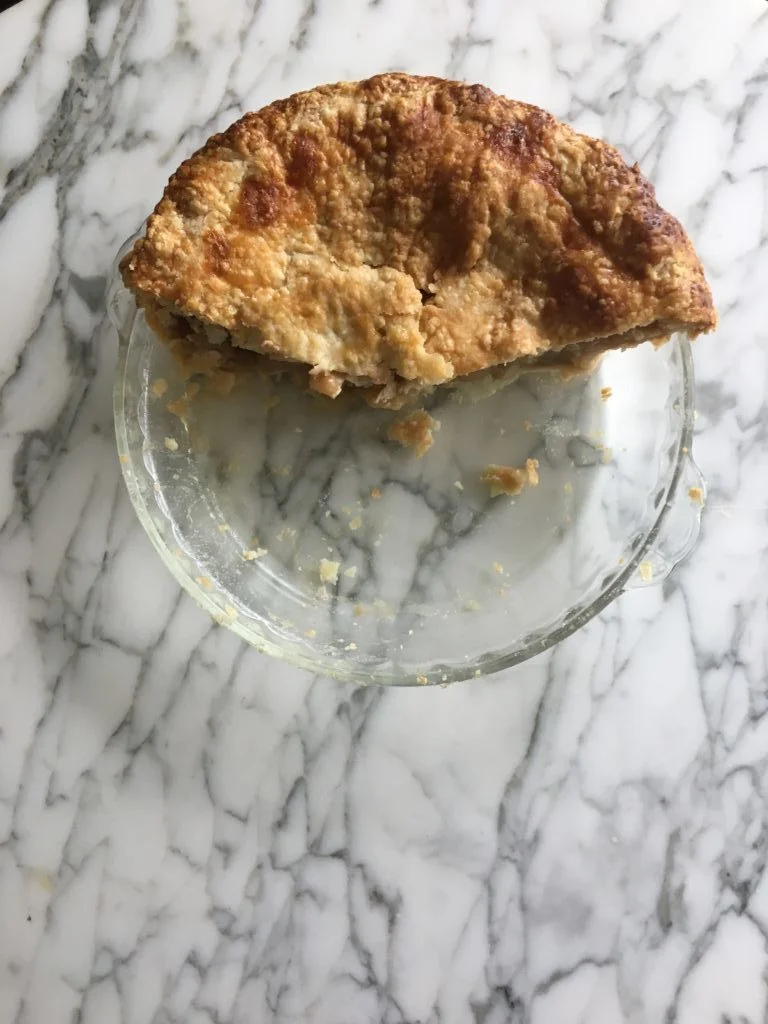
The crust is my official new favorite, using more butter than I’ve ever encountered in an all-butter pie dough recipe (2.5 sticks!). The lid of this pie turns out bronzed and even a little bubbled, strong enough to hold the filling but shattering slightly into buttery flakes at the edges when cut.
An equal amount of magic is in the filling. You allow the cut apples to leach some of their juice, which cooks down into a gooey syrup that thickens when the apples cool, and further when the pie cooks.
In fact, I used PIE LAB as an opportunity to test this recipe again with a new tweak: in pursuit of an almost-caramelly filling, I added a knob of butter to the apple mixture as it cooked. I think it definitely enhanced the filling, but I’ll be working on tweaking it more (perhaps in time for Thanksgiving).
Below is my barely-adapted recipe. For real, the dough recipe should become your new standby for all things pie (both sweet and savory).

Apple Pie, PIE LAB 2017 version
Ingredients:
5 pounds apples, peeled, cored, and sliced into 1/2 inch slices or in slightly larger chunks (I like a combination of Granny Smith and Golden Delicious, it ends up pleasantly, but not overwhelmingly tart)
1/2 cup sugar
2 tablespoons cornstarch
3/4 teaspoon cinnamon
2 teaspoons fresh juice and 1 teaspoon zest from one lemon
3 tablespoons unsalted butter
1 egg white, lightly beaten
For the crust, I’m just sending you straight to Serious Eats’ Easy Pie Dough. Make it exactly as it says, you won’t be disappointed. (Making pie dough in the food processor makes me cackle with glee every time, my brow calm and cool, my anxious heart at peace.)
Pie Filling Recipe
If you’re baking this pie right away, make the dough first, then work on the filling while the dough rests in the fridge.
Preheat oven to 425F.
In a Dutch oven or pot with a similar size and weight, toss apples with sugar, cornstarch, cinnamon, and lemon juice and zest. Let sit for 10 minutes.
Add the butter, then put the pot over low heat. Stir gently but constantly as the apples heat. Do this until the apples are lightly steaming. Cover and continue cooking on the lowest heat setting, stirring frequently. You may feel impatient during this part of the process — what magic could possibly be happening at such low heat?? — but it’s important to not let the apples heat too much, or you’ll break down the apples too quickly, making more of an applesauce than a pie filling. A thermometer is handy for this part of the process — keep the apples under 160F.
No matter what you’re working with, do not let the liquid reach a boil for 20 minutes. After 20 minutes, increase the heat to medium-high and cook about 10 more minutes. The filling is done when you drag a spoon across the bottom of the pot, and the trail left behind closes very slowly.
Transfer this mixture to a baking sheet, spreading out the apples. Let cool for an hour or so.
Roll one disc of your dough out into about a 12-inch round, then fit over a 9-inch pie pan. Add the apple filling, making sure the apples are distributed and there are no major holes. Roll out the second disc of dough into a 12-inch round, and fit it on top of the pie. Trim the excess dough until it only reaches 1/2 inch beyond the pan.
Here is where a lot of people like to show some flair in their crimping skills: pretty fork-marks, pinching and crimping by hand, etc. Do you! I remain hopelessly fumbly at this whole step, so I just pinch and press the two layers of dough into each other, then roll and fold the excess under. The pie still tastes incredible.
(If it’s hot in your kitchen, or it just feels like your dough is getting a little stretchy and warm, pop the pie in the fridge to firm back up for 15 minutes or so, if you like.)
Brush the top of the pie with the beaten egg white, then sprinkle with about a tablespoon of sugar. Cut 4-5 slits in the pie for ventilation.
As insurance to prevent an oven mess, place the pie pan on top of a sheet pan, then put the sheet pan in the oven. Bake at 425F for about 20 minutes, until the pie is light golden brown. Then turn down the heat to 375F and continue baking for 25-30 minutes.
Let cool at least one hour before serving.
Recipe Archive
- FYI
- appetizers
- baked goods
- basics
- beans + legumes
- booze
- bread
- breakfast
- brunch
- cheese
- chicken
- condiments
- dessert
- dinner
- dinner party
- drinks
- eggs
- fall
- fish
- freezer friendly
- fruit
- gluten free
- grains
- greens
- local
- lunch
- make ahead
- meat
- motherhood
- nuts
- pantry
- pasta
- pregnant food
- raw
- reading
- roasted stuff
- salad
- seafood
- sides
- snacks
- soup
- special occasions
- spring
- summer
- sweet
- tacos
- travels
- vegan
- vegetables
- vegetarian
Follow Book + Salt on Instagram